JPEG Optimizer
Intelligently optimize JPEG images — choose optimization mode for best results.
Smart JPEG optimization with 3 quality modes
Jpeg Optimizer Tool For Websites Tutorial
Learn how to optimize jpeg images for faster websites, better user experience, and improved page speed scores all directly inside your browser with no uploads or software.
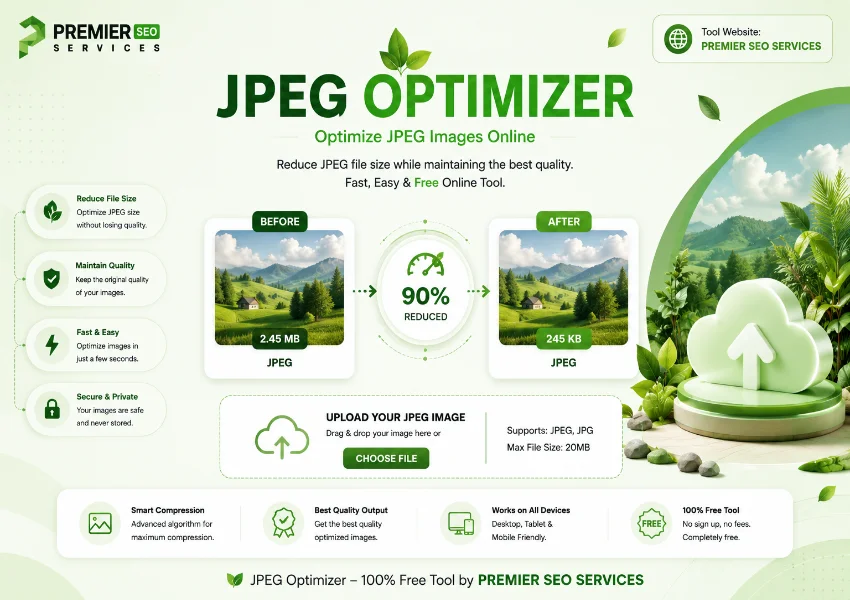
When you run a website every kilobyte matters. Large unoptimised images slow down page loading, hurt your Core Web Vitals scores, and push visitors away before they ever see your content. The JPEG Optimizer tackles this problem head-on by giving you a browser-based tool that reads your image locally, applies intelligent compression, and lets you compare the original against the optimised version side by side. No files leave your device, no account is needed, and the entire process takes seconds.
1 Understanding the Three JPEG Optimisation Modes
The tool offers three distinct compression modes, each tuned for a different balance between file size and visual quality. Choosing the right mode to optimize jpeg depends entirely on what you plan to do with the image. The Lossless mode uses a quality factor of 0.92, which keeps nearly all original detail while still trimming some file weight. This is ideal for photographs you want to archive, images on portfolio pages where quality matters most, or any situation where even minor degradation would be noticeable. The Balanced mode drops the quality factor to 0.75, which typically reduces file size by fifty to seventy percent while maintaining what most viewers would consider excellent quality. This is the sweet spot for most web use blog images, product photos, and social media graphics. The Aggressive mode goes down to 0.45, producing the smallest possible file at the cost of visible compression artefacts. Use this for thumbnails, placeholder images, or any context where file size is critical and minor quality loss is acceptable.
2 Complete Comparison of Optimisation Modes
The table below shows how each mode performs across key metrics. Understanding these numbers helps you make an informed decision before clicking the optimise button. The JPEG Optimizer applies these quality settings through the HTML Canvas API, which means the compression happens locally in your browser using your device processing power with no server round trips.
| Mode | Quality Factor | Typical Reduction | Best For |
|---|---|---|---|
| Lossless | 0.92 | 10 20% | Archives, portfolios, printing |
| Balanced | 0.75 | 50 70% | Blog images, product photos, social |
| Aggressive | 0.45 | 70 90% | Thumbnails, placeholders, previews |
The jpeg image optimizer does not apply any metadata stripping by itself. It compresses the pixel data only. If your original file contains EXIF data, camera information, or GPS coordinates, those remain in the output unless you strip them separately. This is deliberate some users want to preserve metadata for organisation, while others prefer clean files for privacy reasons.
3 How the JPEG Optimizer Tool Works Step by Step
4 Reading the Optimisation Results Dashboard
After you click the optimise button to optimize jpeg, the results panel appears with four key statistics. The Original and Optimised values show the file sizes in bytes, kilobytes, or megabytes depending on how large the file is. The Saved figure tells you exactly how much space you reclaimed a positive number in green means compression worked well, while a rare negative number in red indicates the optimised version ended up slightly larger, which can happen with already compressed images. The Reduction percentage gives you the efficiency of the compression as a single number. Below these stats, the side by side comparison lets you inspect the original and optimised versions visually. This is where you decide whether the quality loss from Aggressive mode is acceptable for your use case or whether you should step up to Balanced for better fidelity.
The canvas based rendering ensures that the original image dimensions remain unchanged during optimisation. If your source is 1920 by 1080 pixels, the output stays at the same resolution. The tool does not automatically resize or crop images it only compresses the existing pixel data. This is important to understand because reducing pixel dimensions before compression can produce even smaller files. Combining resizing with compression gives you the best of both worlds: fewer pixels to encode and tighter compression per pixel. The jpeg optimizer online workflow is designed to be the compression step in a larger image preparation pipeline.
5 Who Benefits from Using a JPEG Optimizer Online
6 Understanding the Canvas Rendering and Privacy Advantages
Because the jpeg optimizer free tool runs entirely inside your browser using the HTML Canvas API, your images never travel across the internet. The file you select stays on your device the entire time. This is fundamentally different from cloud based optimisers that require you to upload images to a remote server, wait for processing, and then download the result. The local approach means there are no file size limits, no queue times, no privacy concerns, and no internet dependency beyond the initial page load. You can optimise sensitive images client photographs, product shots for unreleased items, personal family photos without worrying about where they end up stored or who has access to them.
The online JPEG Optimizer draws the image onto an off screen canvas, applies the quality setting during the toBlob conversion, and generates the compressed JPEG as a binary blob. The original file data is never converted to a data URL or sent anywhere. This architectural choice makes the tool instant even large files process in under a second on modern hardware and completely private. For users who optimise dozens of images daily, this speed and privacy combination is a significant advantage over server based alternatives that charge per image or impose monthly quotas.
7 Best Practices and Productivity Tips for JPEG Optimisation
Getting the most out of this jpeg optimizer free tool comes down to a few simple habits. Always start with the highest quality source image you have. Compressing an already compressed JPEG produces worse results than compressing the original full quality version. If you are unsure which mode to use, run a test with the same image through all three modes and compare the side by side results. You will quickly develop an intuition for which settings match your quality standards. For batch workflows, consider processing images in groups upload one, optimise it, note the reduction percentage, and apply the same mode to similar images for consistent results across your site.
8 Troubleshooting Common JPEG Optimisation Issues
Most issues with the jpeg optimizer online free tool come down to a few repeatable scenarios. If the optimised file ends up larger than the original, you are likely feeding in an already aggressively compressed image switch to Lossless mode or use the original source file instead. If the side by side preview shows a white background where transparency was expected, remember that JPEG does not support alpha channels. The canvas fill is set to white before drawing, which is standard for JPEG encoding. If the download button does not trigger, check that your browser allows automatic downloads from the current site. All modern browsers support the download attribute on anchor elements, but some enterprise security policies may block them.
Frequently Asked Questions
Common questions about JPEG optimisation, compression modes, and tool usage
Whether you are a web developer aiming for perfect Lighthouse scores, a photographer delivering proofs to clients, or a content creator publishing image rich articles, this jpeg size optimizer gives you a fast, private, and reliable way to compress JPEG images. Upload, pick a mode, compare the results, and download everything happens locally in seconds with no account required. Add this optimiser to your image preparation workflow and start shipping leaner, faster loading pages today.